
Fort Mackinac Milky Way. Imaging the Milky Way with any camera system presents a photographer with countless choices related to framing and target selection. In fact, it can be shot with almost any equipment, whether it be an advanced telescopic setup or simply your smartphone. This long-exposure shot of the Milky Way was captured from an old cannon platform at Fort Mackinac on Mackinac Island, Michigan, with the aid of a tracking mount. The view was then blended with a static ground shot of the town, harbor, and Mackinac Bridge in the distance.
Most novice astro-photographers have a defining moment, when they find themselves staring in disbelief at what they just recorded in their camera. For me, that moment came a decade ago, standing outside on my back patio with a new Canon Rebel T1i DSLR. Although dark skies will reveal the Andromeda Galaxy to the unaided eye, suburban light pollution had forced me to clumsily determine its location using star charts. Targeting our galactic neighbor as well as I could, I simply took a string of exposures with a basic camera lens.
The setup was crude, at best. And the results were even more unsophisticated (see the image above). Still, that singular view on the back of my camera proved to me that astrophotography was something I could do from my own backyard.
I have never stopped striving for better results. Every year that goes by brings improvements in skill, hardware, and software that further enable amateurs. This is a golden age of astrophotography, and exploration of the vast cosmos is a journey that is accessible to anyone inspired enough to dive in — as long as they stick with it.
Getting started
With a background in aerospace engineering and product development, I’m no stranger to technical challenges, and that approach to problem-solving has been a significant asset on my journey. So, after seeing Andromeda 10 years ago through my DSLR, I immediately sought ways to improve. Progress came slowly at first. Fresh to the realm of astrophotography, I really knew nothing of the path on which I had embarked. I had little experience with photography of any sort, not to mention limited time and money. But over the nights, I realized I could do astrophotography my way, not worrying about getting it perfect from the get-go.
In 2013, I finally acquired a suitable telescope rig: an 8-inch Celestron EdgeHD and AVX mount. I had planned to spend most of my time with the scope visually observing the cosmos. But after my first few sessions, I never installed an eyepiece again. Instead, my Canon T1i took up residence at the back of the rig. Any experienced astrophotographer will tell you this setup was not ideal for a novice, but we tend to be a stubborn bunch, so I pressed on.
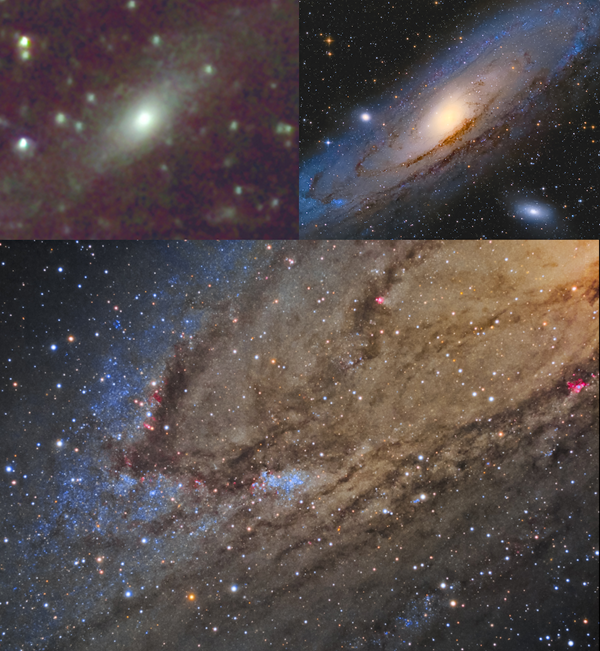
- First Galaxy Photograph: Andromeda Galaxy imaged with Canon Rebel T1i, Canon 50mm f/1.8 lens, fixed tripod (11 two-second exposures).
- A Beginner’s Setup: Andromeda with Canon Rebel T1i, 6-inch f/4 Newtonian, Celestron AVX (1.5 hours total exposure).
- A More Advanced Setup: ZWO ASI1600MM, Celestron 8-inch EdgeHD, Orion Atlas Pro, LRGB filters (10 hours total exposure [378m; 75m; 75m; 75m]).
I quickly learned which components were impeding my results, and by 2016, I had improved the system to the point where it was providing reliable, quality images night after night. This is still my primary imaging telescope, although everything attached to it has been upgraded in some way. The upgrades took time, and few by themselves were game changers. Adding an autoguider allowed me to take longer exposures and installing an autofocuser improved my ability to repeatably focus the telescope. Another key improvement came with my purchase of a cooled monochrome astronomy camera. The image quality of this device far surpassed that of my previous DSLR, allowing better results with far fewer post-production headaches.
Lastly, I focused on automating my setup with software. Although many options exist now, Sequence Generator Pro was one of the first affordable choices on the market, and it is still my go-to because of its ease of use and familiarity. It allows for planning, sequencing, and full nights of automated imaging — no micro-management or intervention required. With this program, I found myself setting up more often and letting it run while I went about other business, which was often processing the results from earlier sessions. Once automation was a reality, I was able to let the telescope collect a night’s worth of images even while I slept.
Selecting your hardware
The configuration I settled on for most of my deep-sky photography is that Celestron EdgeHD 8-inch telescope with the 0.7x reducer, Moonlite CHL focuser, Orion Thin Off-Axis Guider, ZWO ASI120MM guide camera, ZWO Electronic Filter Wheel with Astronomik LRGB and narrowband filters, and ZWO ASI1600MM main imaging camera. All of this rides on an Orion Atlas Pro telescope mount. Ancillary gear is also required, in the form of power delivery and distribution, dew mitigation, USB hubs and cables, and, of course, computer control. There are no turnkey solutions here, and it is up to the user to construct and optimize their individual system.
This setup operates at a focal length of just under 1500mm and offers an excellent balance of system performance and value. It was perhaps a backward approach, as most novice astroimagers begin exploring the capabilities of scopes with widefield images. But I started by shooting galaxies and nebulae at long focal lengths. I was fascinated by the tiny details of distant objects. This type of photography was a tremendous challenge, especially for a beginner. It required extreme precision and any errors were magnified. I worked hard to continually optimize the system’s performance, and I could eventually produce results that were limited only by my sky conditions.
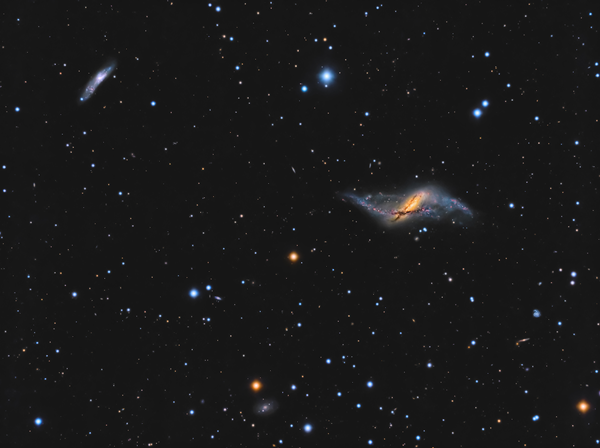
A polar ring galaxy. Looking far out into the constellation Pisces, we come across this petite cosmic gem. NGC 660 is estimated to be 45 million light-years away and spans only a few arcminutes, which makes it quite small. This galaxy is unique due to the oblique angle — about 45 degrees — of its polar ring.
Although I initially focused heavily on this imaging rig, I also developed a keen interest in even more basic and accessible gear. This led me to working on and testing many other imaging systems. Of these, a good number have proven to be quite versatile, offering excellent value. I have amassed a collection of hardware: telescopes, lenses, cameras, filters, mounts, and so on. And by using them, I have come to understand the benefits and drawbacks of each.
Acquiring your target
As an astrophotographer without a permanent observatory, I’ve had to work hard to expedite setting up my equipment for each night of imaging. I have made this task easier by leaving most of my gear assembled between sessions, letting me move it as one piece. Once outside, I simply complete the necessary polar alignment. I can usually be imaging the sky in mere minutes.
As I mentioned earlier, I constructed my system with the goal of automating as much of the imaging process as possible. On a typical evening, I will select my targets and schedule the session. Then, once I click “start,” the system points the telescope, focuses, engages autoguiding, and begins imaging. I will generally target a few objects per night using various filters, selecting the optimal times for capturing each based on current conditions. The software even employs a recovery mode for restarting the sequence when something goes wrong. This is not uncommon and can be triggered by many things, such as a cloud passing overhead.
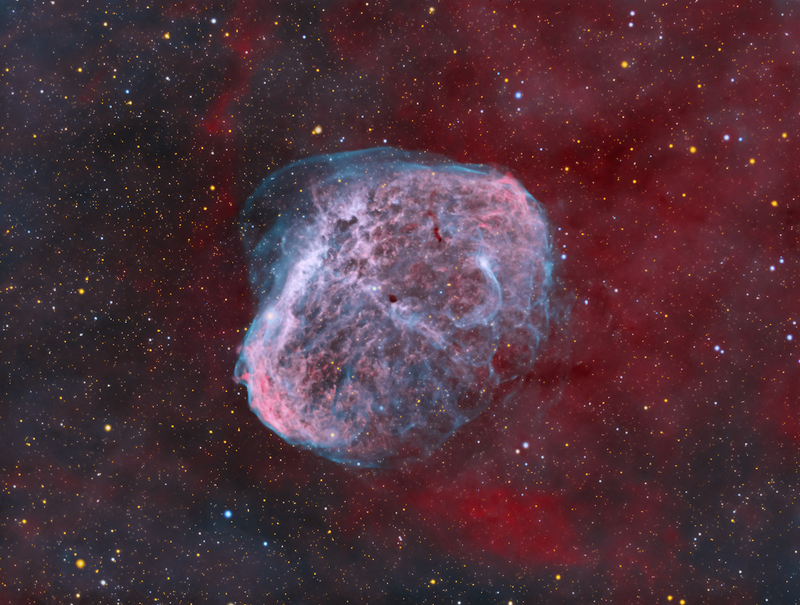
The Crescent. This wild nebula, NGC 6888 in Cygnus, is a result of competing stellar winds shed from the Wolf-Rayet star within. Late in its life, the star is actively fusing heavy elements. This violent production of energy has blown out most of the hydrogen and helium from the star’s outer atmosphere, giving rise to the delicate and fascinating structure of the surrounding emission nebula, which was captured here thanks to nearly 27 hours of exposure time.
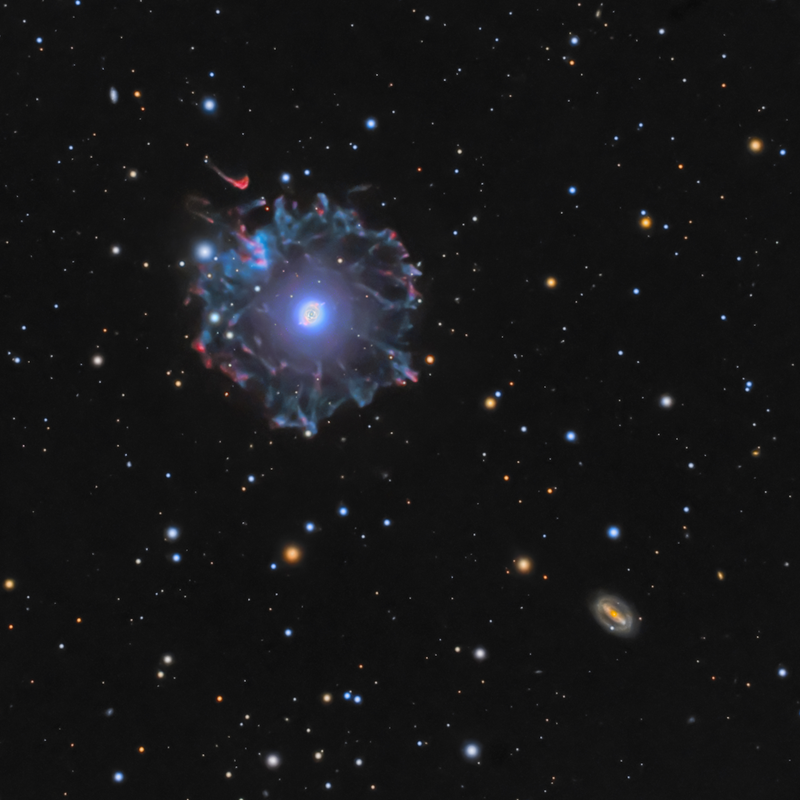
The Cat’s Eye. A millennium ago, the central star of NGC 6543 began its transition from a red giant to a hydrogen-depleted state. It shed its outer atmosphere into space, leaving behind a bare oxygen and carbon core. This expanding planetary nebula, photographed in both narrowband and LRGB over some 26 hours, is continually shaped by violent yet surprisingly subtle forces.
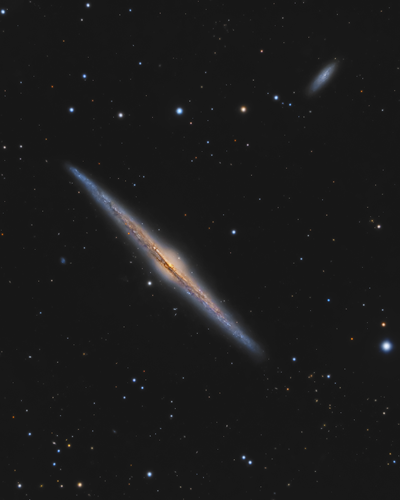
The Needle Galaxy. About 40 million light-years away, looking toward the constellation Coma Berenices, lies a beauty of an edge-on spiral: NGC 4565. It is truly one of the finest examples of its kind that is visible from Earth.
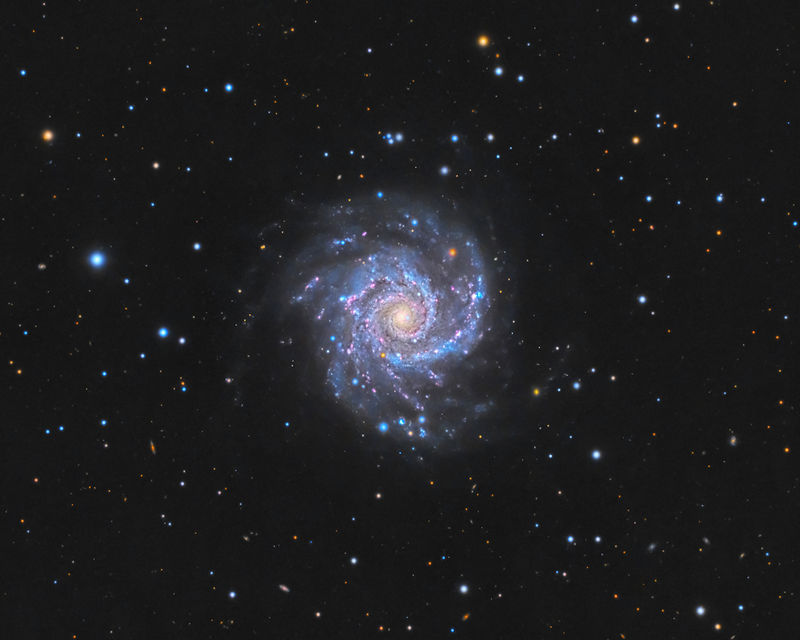
The Phantom Galaxy. Peering more than 30 million light-years into deep space, past the Milky Way in the constellation Pisces, we come across a prime example of what’s known as a “grand design spiral.” M74 is an orderly and very structured face-on spiral galaxy. Among the faintest objects in Messier’s famous catalog, it has picked up the “Phantom Galaxy” moniker due to its fleeting nature in visual observations.

Active Region 2804. The Sun reveals features of the plasma in its chromosphere in this stacked and contrast-enhanced view taken with a Hydrogen-alpha (Hα) filter Feb. 27, 2021. Active Region 2804 — a bright, oblong sunspot that could swallow Earth whole — sits near the upper edge, showing off its tangled magnetic field.
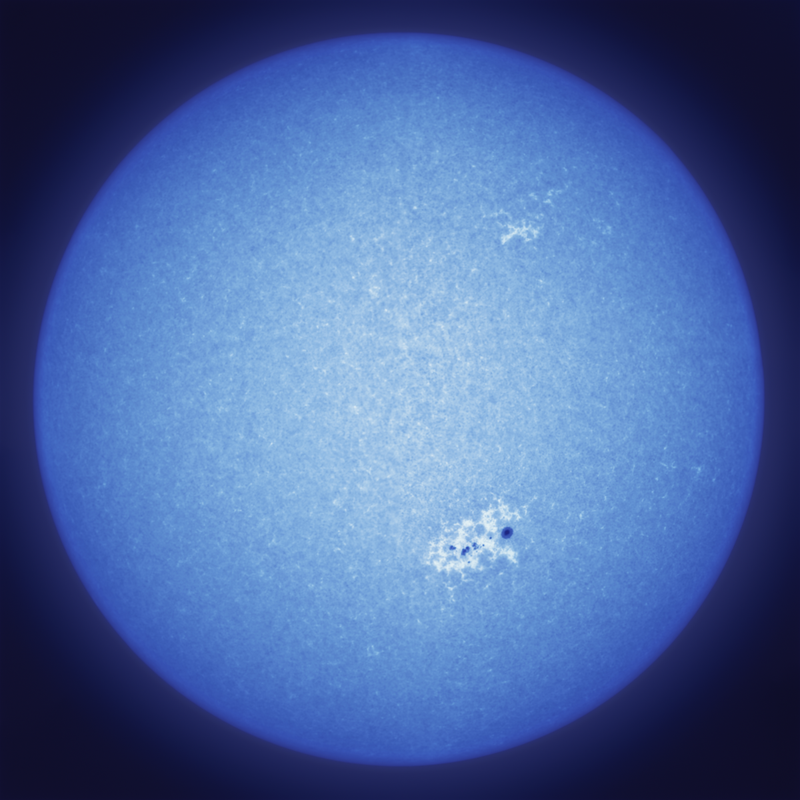
Solar calcium. Just past the extreme blue end of the visual spectrum and into the ultraviolet lies the Calcium H emission line. Sunlight filtered to this narrow band of light reveals a unique look at the upper atmosphere of our star.
The Moon
Imaging Luna is perhaps the easiest and most natural point of entry for most aspiring astrophotographers. Basic shots, including those taken during lunar eclipses, are not very difficult to capture. And over time, you can learn how to enhance highlights and color variations produced by compositional differences in lunar regolith.
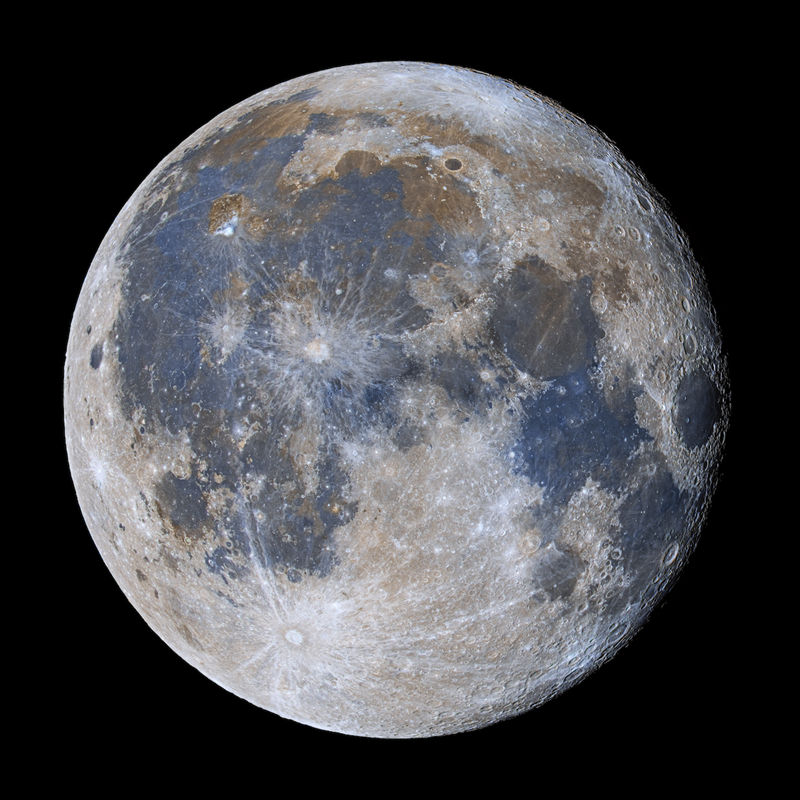
Moon hues. By increasing the saturation of the Moon’s natural colors and boosting the contrast between features, the lunar surface can come alive with a new perspective. The multi-colored surface seen here is a result of different soils and layers that were created and spread through both chemical and mechanical processes. Some examples of this include the bright rays deposited by impact ejecta, the vast plains created by ancient lava flows, and the darkening effects of space weathering.
Special events
Whether it’s comets, eclipses, planetary conjunctions, aurorae, meteor showers, satellite transits, or anything else astronomical, sometimes the greatest challenge in imaging sky events is finding out about them in the first place. Generally, a magazine, observing guide, online forecasting resource, and/or planetarium software can greatly help you stay informed on the most significant upcoming events. For location-specific treats, such as aurorae or a space station transiting the Sun or Moon, forecasting websites are indispensable resources.
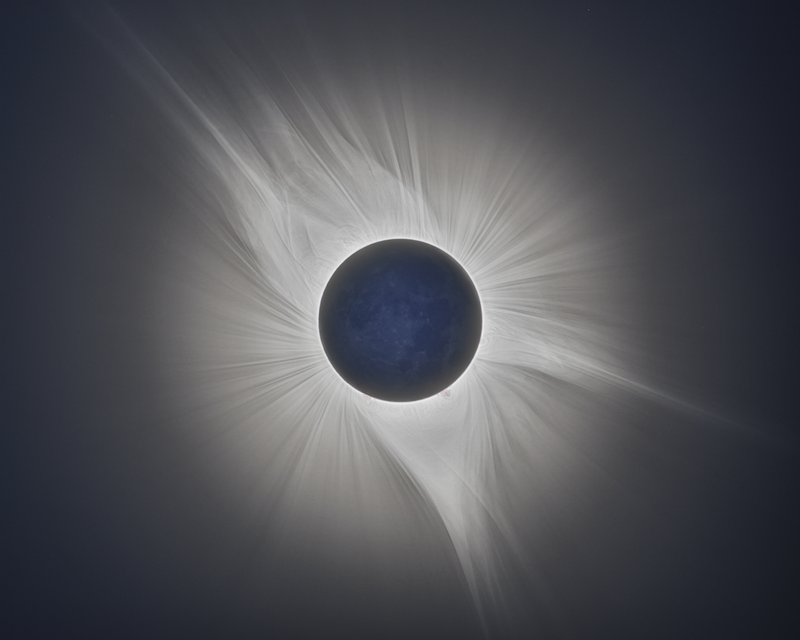
Great American Eclipse. The awesome beauty of nature was on full display during totality of the solar eclipse Aug. 21, 2017. Totality is truly a sight to behold, and perhaps the finest example of a special astronomical event. Totality’s brevity can also make it a very stressful time for a first-time eclipse photographer. But no matter what, you should try to take at least a few moments to observe the sight with only your own eyes.
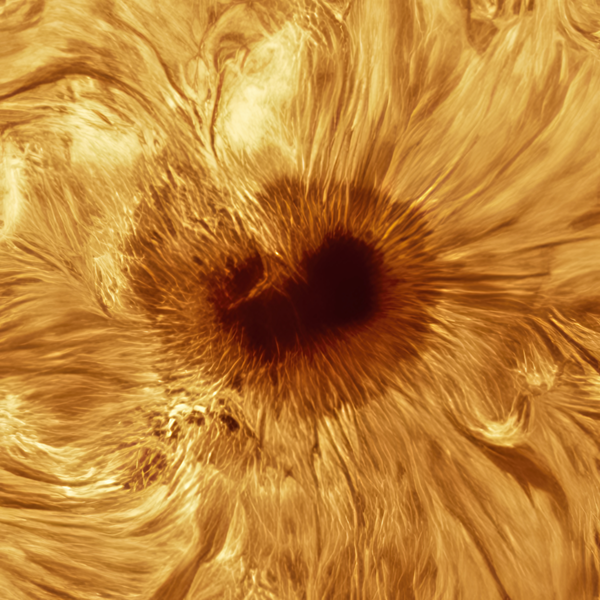
Sunspot in AR 2786. This extreme close-up shows the details of a magnificent sunspot that was visible on the Sun Nov. 28, 2020. Such spots are caused by local magnetic fields interacting with hydrogen plasma, which cools the area and makes it appear darker than its surroundings.
Beating light pollution
Most of my astrophotography work is done from my moderately light-polluted suburban backyard patio. The site rates a Class 5 on the Bortle scale, which ranges from 1 (no light pollution) to 9 (extreme light pollution). Though some types of astrophotography — like imaging the planets, the Sun, and the Moon — are relatively unaffected by artificial skyglow, the intrusion of light pollution in deep-sky images greatly increases noise and diminishes photographic contrast. But don’t fret, there are ways to combat it.
My primary strategy is to focus on getting longer total exposure times. This effectively reduces background noise in a stacked image through the process of averaging, which improves the signal-to-noise ratio. For particularly faint objects, this means I might require 50-plus hours of exposure comprising several hundred sub-frames, which must be built up over many nights of imaging.
Another method to combat light pollution is using narrowband filters. These filters completely reject extraneous light, allowing only the light from ionized gases in space to pass through. Furthermore, narrowband filters also block unwanted moonlight, allowing you to capture deep-sky images at any time during the month.
It is still true that the best results come from beneath extremely dark skies, but the gap is closing. For me, constantly venturing to a worthy dark-sky site or using a remotely hosted telescope system isn’t a realistic possibility. But working from home, even with modest equipment in suboptimal conditions, I’m able to use the aforementioned techniques to produce astonishing results that simply were not possible a few decades ago.
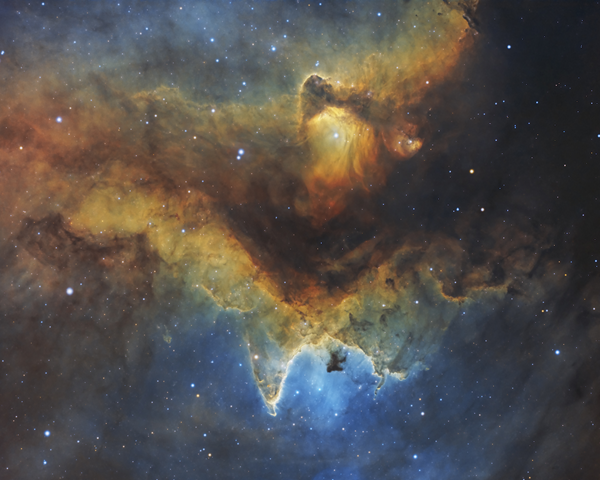
Inner Soul. The Soul Nebula (IC 1848) is a nearby star-forming region in the constellation Cassiopeia. Its young, hot stars carve out and ionize pockets of nearby gas, causing them to glow in sculptured forms. This high-magnification view showcases the very center of the extended nebula. A cropped version of this image, which required 38 total hours of exposure time, was selected as NASA’s Astronomy Photo of the Day in November 2020.
Software processing
Physically capturing shots of cosmic objects with specialized equipment is only a small part of the final product. Post-processing my results, in most cases, is the most significant factor in how an image turns out. My journey in front of the computer screen has been significantly longer and more complex than managing the gear outdoors.
For deep-sky imaging, I started processing my images using Deep Sky Stacker and software I already used for my daytime photography work: Lightroom and Photoshop. Digging in a bit deeper, I transitioned to the more astrophotography-focused PixInsight for my entire preprocessing workflow, including deconvolution, noise reduction, and histogram stretching. I still use Photoshop for final color editing and enhancing details. I’ve also added plug-ins from TopazLabs to help in this regard.
Post-processing different types of astroimages calls for different techniques and software. For example, solar system imaging employs many different pieces of software, but much of it is available for free or for a donation. Examples include Firecapture, SharpCap, Autostakkert!, PIPP, ImPPG, and many more.
Software editing allows me to add a personal, artistic touch to my images. And it can transform a rather mundane shot into an eye-catching photograph. Honing these skills is instrumental to improving the final quality of my results, and it has been vital to achieving my goals as an astrophotographer.
The continuing inspiration
The further I became immersed in astrophotography, the more abundantly clear it became that there are many more possible avenues to explore. Space is vast and hides countless varied gems just waiting to be captured. I began with deep-sky photography of distant galaxies and nebulae, but in time I branched out and bagged shots of the Sun, the Moon, bright planets, our Milky Way, and even some unique astronomical events like comets, eclipses, satellite transits, aurorae, and more.
Astrophotography has grown to become a defining aspect of my life. Over the years, my work has been published, awarded, and shared widely. It has been truly exciting to see my photos in print, selected as NASA’s Astronomy Photo of the Day, and even put on display in a museum for having won an award in the Astronomy Photographer of the Year competition in Greenwich, England.
Imaging the sky has always been a deeply personal hobby that allows me to tour the universe. The images shared in this article are postcards from that journey. I find inspiration in capturing the vast cosmos, as well as reflecting on our tiny place within it. I hope you will too.
Source: astronomy.com